

Build and Train a Mixture-of-Experts (MoE) LLM from Scratch
An end-to-end guide to training an Mixture-of-Experts (MoE) LLM from scratch.

Most modern-day LLMs use the Mixture of Experts (MoE) architecture. This includes Grok-1, DeepSeekMoE, gpt-oss, and Mixtral (and many other proprietary LLMs whose architectural details aren’t publicly available).
In the previous lessons on Into AI, we learned:
🌈 What the Mixture-of-Experts (MoE) architecture is and how it works
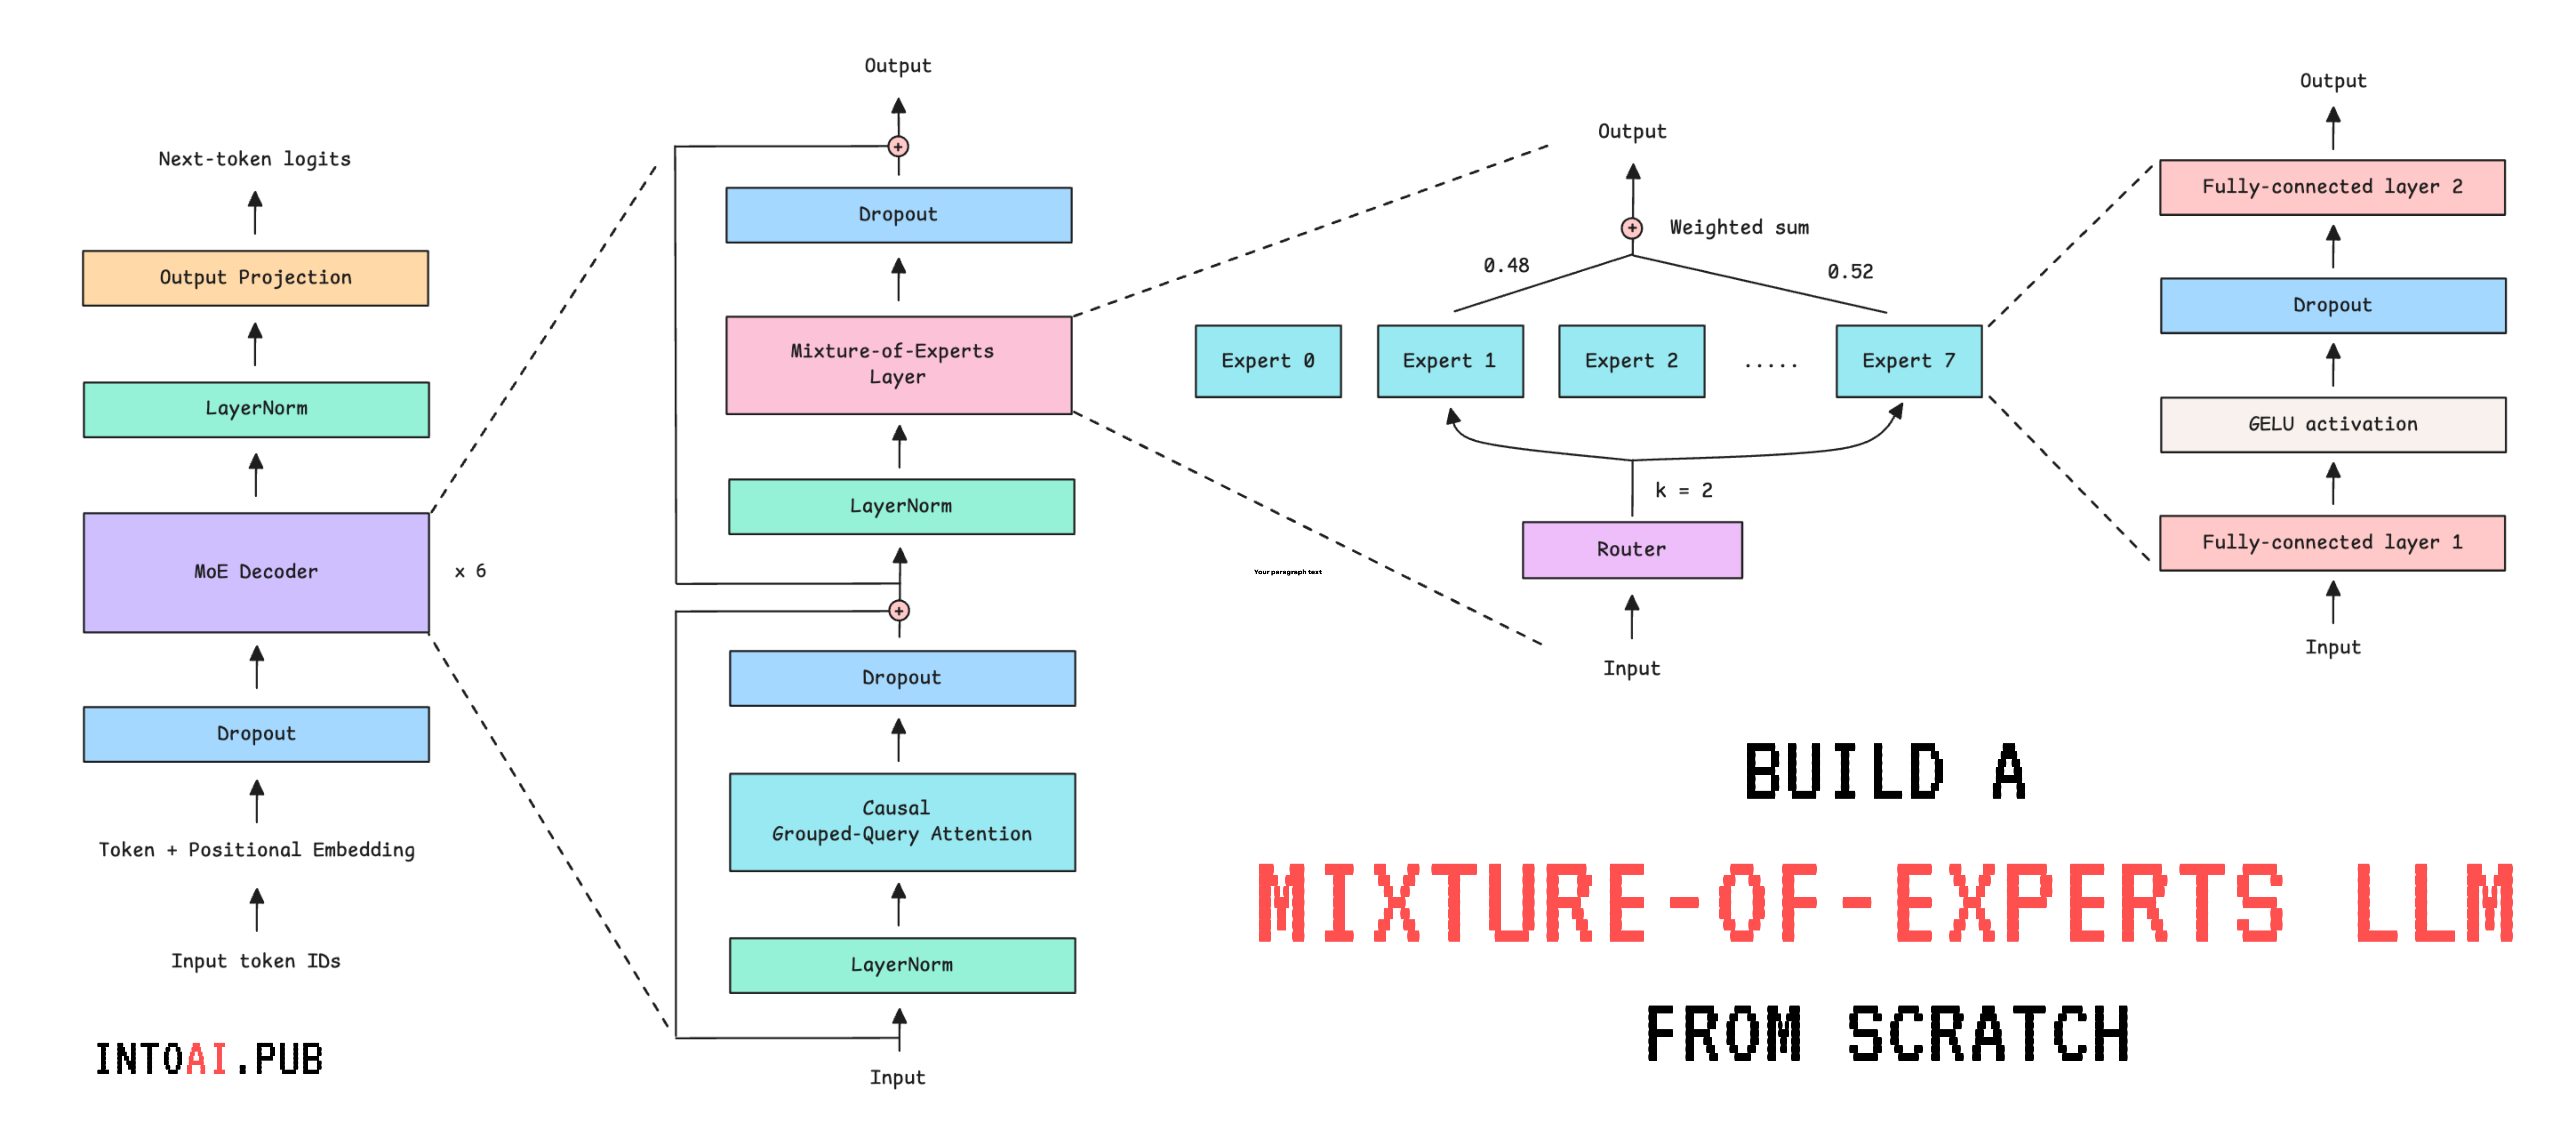
🎈Built the Mixture-of-Experts (MoE) decoder-only transformer from scratch
In this lesson, we will:
Build an LLM using the MoE transformer with Grouped Query Attention (GQA)
Train it on a publicly available database from Wikipedia
Generate text from the trained LLM
The following are the steps that we implement.
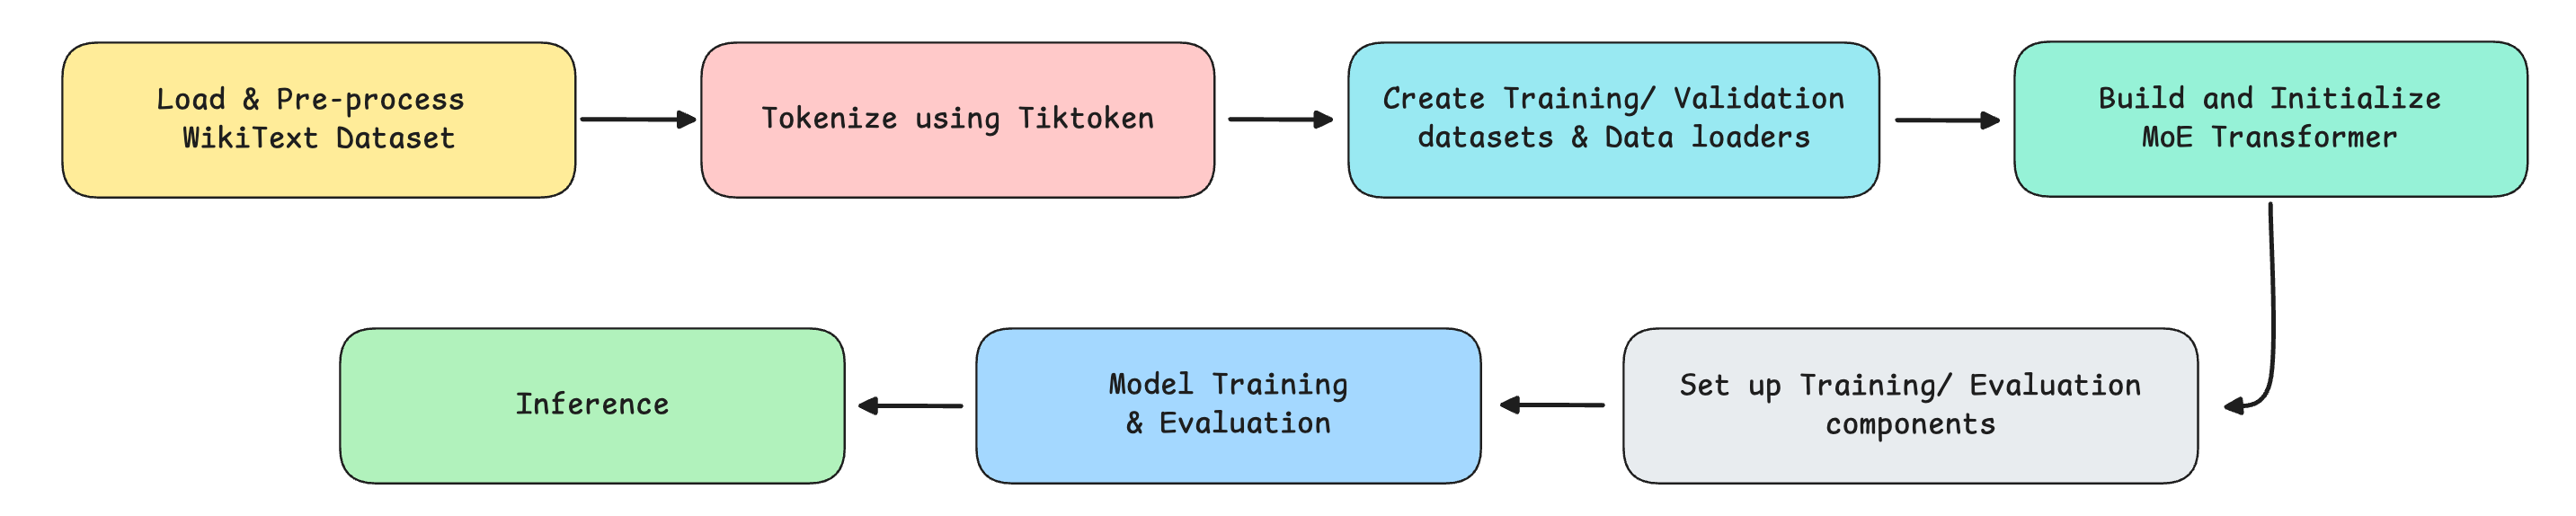
Let’s begin!
Import Necessary Packages
# Standard libraries
import math
import random

# Hide deprecation warnings
import warnings
warnings.filterwarnings('ignore')

# PyTorch core
import torch
import torch.nn as nn
import torch.optim as optim

# For processing data
from datasets import load_dataset
from torch.utils.data import Dataset, DataLoader

# BPE tokenizer
import tiktoken

# Training utils
from torch.nn.utils import clip_grad_norm_
from torch.optim.lr_scheduler import CosineAnnealingLR

# Progress bar
from tqdm import tqdm
Before we move forward, I want to introduce you to the Visual Tech Bundle.
It is a collection of visual guides that explain core AI, LLM, Systems design, and Computer science concepts via image-first lessons.

Others are already loving these books.

This includes Dharmesh Shah, the co-founder and CEO of HubSpot.
❤️ I’m sure that you will love these too:
Now back to our lesson!
Getting our data ready
1. Download the dataset
We will use the WikiText dataset from Hugging Face to train our model. This dataset is derived from verified Wikipedia articles and contains approximately 103 million words.
It is downloaded as follows.
# Load WikiText dataset
train_data = load_dataset("wikitext", "wikitext-103-v1", split="train") # Train subset
val_data   = load_dataset("wikitext", "wikitext-103-v1", split="validation") # Validation subset
Let’s check out a training example from this dataset.
# Training subset example
print(train_data['text'][807])

"""
Output:
The International Civil Aviation Organization ( ICAO ) defines general aviation ( GA )
as " an aircraft operation other than a commercial air transport operation
or an aerial work operation . " It defines commercial air transport ( CAT )
as " an aircraft operation involving the transport of passengers , cargo
or mail for remuneration or hire " , and aerial work as " an aircraft operation
in which an aircraft is used for specialized services such as agriculture ,
construction , photography , surveying , observation and patrol , search and
rescue , aerial advertisement , etc . "

"""
There’s a little problem with this dataset where some text examples are blanks and headings are formatted as “ === HEADING === “, as shown below.
# Unwanted training subset example
print(train_data['text'][804:807])

"""
Output:
['', ' = = Definitions = = \n', '']
"""
Alongside this, WikiText-103 was built with a vocabulary consisting of words (rather than sub-words/ characters), and any word that appeared fewer than three times was replaced with <unk>.
This is shown below.
# UNK marker
print(train_data['text'][80])

"""
Output:
 <unk> <unk> 2
"""
We need to get rid of these to clean up the dataset.
We also need an End-of-Text (EOS) token called <|endoftext|> between separate sections and articles, so that the model learns natural stopping boundaries and doesn't try to connect unrelated content.
(We will come back to re-using the EOS token when discussing the helper function for text generation/inference.)
Both of these changes are made using a helper function as follows.
def clean_text(dataset):
    # EOS token
    EOS = "<|endoftext|>"

    cleaned = []
    for text in dataset["text"]:
        # Strip surrounding whitespace
        line = text.strip()

        # Keep only non-empty lines that aren't headings (such as "=== HEADING ===")
        if line and not line.startswith("="):
            # Remove <unk> markers and normalize whitespace
            cleaned.append(" ".join(line.replace("<unk>", "").split()))

    # Join all entries into a string, separated by EOS token
    return EOS.join(cleaned) + EOS

# Clean training and validation text
training_text = clean_text(train_data)
validation_text = clean_text(val_data)
A short subset of training_text is shown below.
# Print a subset of 'training_text'
print(training_text[3457:3700])

"""
Output:
Each character has a field and distance of movement limited by their
Action Gauge . Up to nine characters can be assigned to a single mission .
During gameplay , characters will call out if something happens to them ,
such as their health points ( HP ) getting low or being knocked out
"""
2. Tokenize the dataset
We previously learned how to build a character-level tokenizer from scratch.

We have also used it to train an LLM from scratch.
But because it is character-based, training an LLM using it makes the model learn the meaning of text from individual letters rather than semantic units. This makes training painfully difficult.
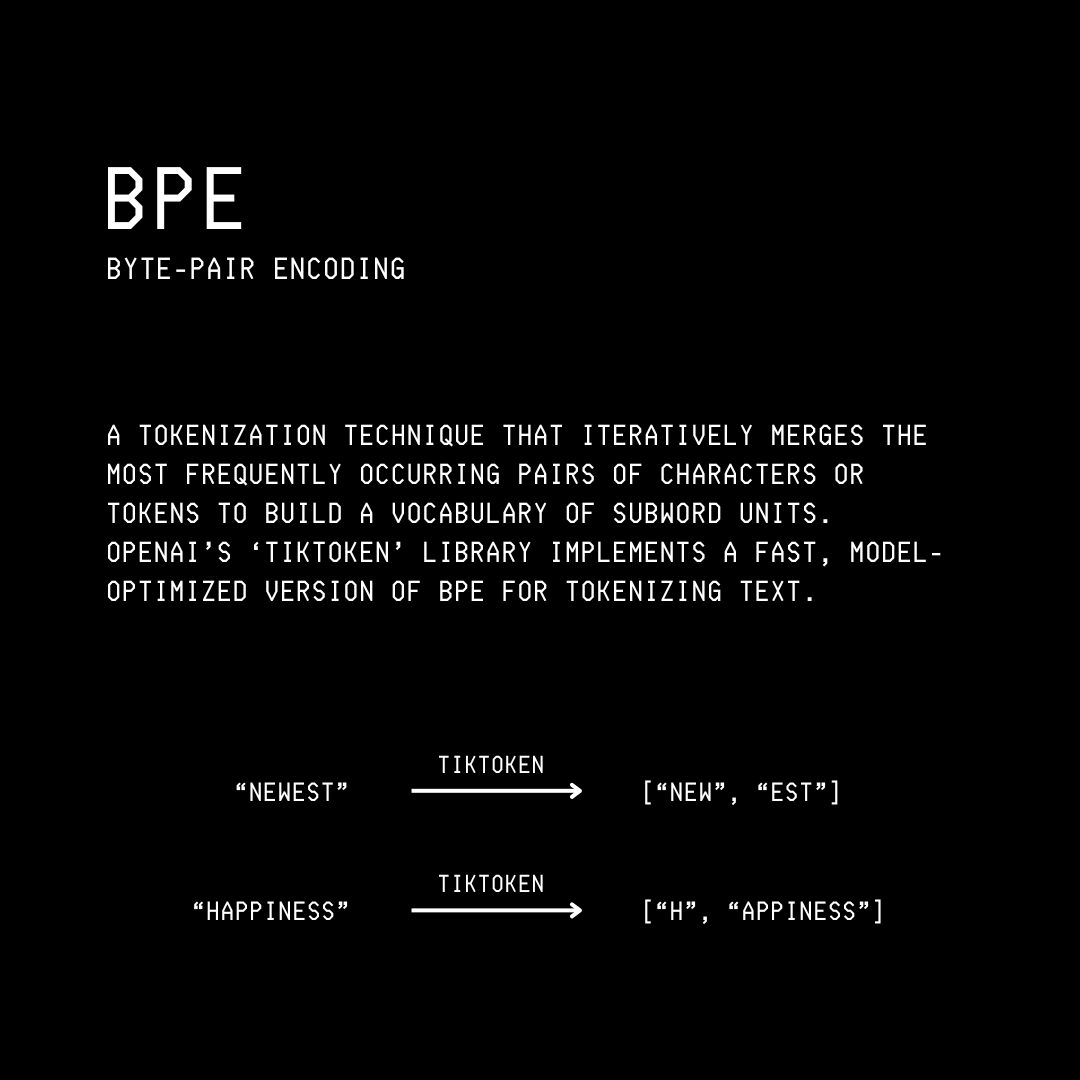
For this tutorial, we will instead use Tiktoken, a fast BPE tokeniser used in OpenAI's models. It is a sub-word tokenizer (breaks down words into sub-words) that better captures language structure than a character-level tokenizer, enabling faster LLM training.
We start by creating an instance of Tiktoken as follows.
# Create an instance of Tokenizer used by GPT-2
tokenizer = tiktoken.get_encoding("gpt2")
The vocabulary size when using the Tiktonen tokenizer for GPT-2 is 50,257. This means that the tokenizer recognizes 50,257 unique subwords.
# Check vocabulary size
vocab_size = tokenizer.n_vocab

print(f"Vocabulary size: {vocab_size}")

# Output: Vocabulary size: 50257
3. Create a dataset required for language modeling
Once we have tokenized our dataset, we need to load and serve the data during training. This is where the TextDataset class comes in, which inherits from PyTorch’s Dataset class, and has the following methods:
__init__: Tokenizes given text (tokens to token IDs) and sets the maximum sequence length (max_seq_length)__len__:__getitem__: Returns a training sequence and its targets (tokens shifted forward by one position) at a given index
# Dataset for language modeling
class TextDataset(Dataset):
    def __init__(self, text, tokenizer, max_seq_length):
        # Convert text to token IDs
        self.tokens = tokenizer.encode(text, allowed_special="all")

        # Maximum length of each training sequence
        self.max_seq_length = max_seq_length

    # Get number of valid training sequences
    def __len__(self):
        num_sequences = (len(self.tokens) - 1) // self.max_seq_length
        return num_sequences

    # Get an input sequence and targets
    def __getitem__(self, idx):
        # Start index of the sequence
        start = idx * self.max_seq_length

        # End index of the sequence
        end = start + self.max_seq_length

        # Input token sequence
        input_ids = torch.tensor(self.tokens[start:end], dtype=torch.long)

        # Next-token targets/ labels (shifted by one character)
        target_ids = torch.tensor(self.tokens[start+1:end+1], dtype=torch.long)

        return input_ids, target_ids
Let’s use the TextDataset class to create the training and validation datasets.
# Define maximum sequence length
MAX_SEQ_LENGTH = 128

# Create training and validation datasets
train_dataset = TextDataset(training_text, tokenizer, MAX_SEQ_LENGTH)
val_dataset = TextDataset(validation_text, tokenizer, MAX_SEQ_LENGTH)
The number of training sequences in the training and validation datasets is as follows.
print(f"Number of training sequences: {len(train_dataset):,}")
print(f"Number of validation sequences: {len(val_dataset):,}")

"""
Output:
Number of training sequences: 876,162
Number of validation sequences: 1,828
"""
And this is how a training sequence and its target look.
# Example of a training sequence and its target
input, target = train_dataset[16]

print("Input IDs:\n", input)
print("\nTarget IDs:\n", target)

print("\nDecoded Input:\n", tokenizer.decode(input.tolist()))
print("\nDecoded Target:\n", tokenizer.decode(target.tolist()))

"""
Output:
Input IDs:
 tensor([  262,  1271,   286, 22469,  4991,   583,  4365,   764,   317,   636,
          286,   428,  8515,  2950,  4441,  3748,  7514, 14520,  4981,   329,
         1123,  2095,   705,    82,  1767,   764,   554,  1502,   284,  4620,
          428,   837,   262, 22849,  4847, 16560,   656,   262,  1218,   983,
          547,  4615,   837,   355,   484,  1718,   510,   257,  1588,  6903,
          286,  4088,  2272,  2622,   329,   262,  8561,   764,  1119,   635,
        12328,   262,  8722,  6460,   290, 10152,   286,   711,   523,   484,
          714,  5198,   284,   649,  1938,   981, 26645,   262,  6393,  6805,
          286,   262,  2168,   705, 11327,   764,   383, 15064,  3341,   547,
         3066,  2402,  1903,   287,  2478,   764,   383,  2095,  9824,   547,
         1760,   416,  8835,    73,   280,   837,   508,   550,  3111,   319,
          262,  2180,   569, 18354,  7496, 17740,  1830,   764,  1649,  4441,
          262, 17871,  5321, 11630,   837,  8835,    73,   280])

Target IDs:
 tensor([ 1271,   286, 22469,  4991,   583,  4365,   764,   317,   636,   286,
          428,  8515,  2950,  4441,  3748,  7514, 14520,  4981,   329,  1123,
         2095,   705,    82,  1767,   764,   554,  1502,   284,  4620,   428,
          837,   262, 22849,  4847, 16560,   656,   262,  1218,   983,   547,
         4615,   837,   355,   484,  1718,   510,   257,  1588,  6903,   286,
         4088,  2272,  2622,   329,   262,  8561,   764,  1119,   635, 12328,
          262,  8722,  6460,   290, 10152,   286,   711,   523,   484,   714,
         5198,   284,   649,  1938,   981, 26645,   262,  6393,  6805,   286,
          262,  2168,   705, 11327,   764,   383, 15064,  3341,   547,  3066,
         2402,  1903,   287,  2478,   764,   383,  2095,  9824,   547,  1760,
          416,  8835,    73,   280,   837,   508,   550,  3111,   319,   262,
         2180,   569, 18354,  7496, 17740,  1830,   764,  1649,  4441,   262,
        17871,  5321, 11630,   837,  8835,    73,   280,   373])

Decoded Input:
  the number of playable units per mission . A part of this upgrade involved creating
  unique polygon models for each character 's body . In order to achieve this ,
  the cooperative elements incorporated into the second game were removed ,
  as they took up a large portion of memory space needed for the improvements .
  They also adjusted the difficulty settings and ease of play so they could appeal
  to new players while retaining the essential components of the series ' gameplay .
  The newer systems were decided upon early in development . The character designs
  were done by Honjou , who had worked on the previous Valkyria Chronicles games .
  When creating the Nameless Squad , Honjou

Decoded Target:
  number of playable units per mission . A part of this upgrade involved creating
  unique polygon models for each character 's body . In order to achieve this ,
  the cooperative elements incorporated into the second game were removed ,
  as they took up a large portion of memory space needed for the improvements .
  They also adjusted the difficulty settings and ease of play so they could appeal
  to new players while retaining the essential components of the series ' gameplay .
  The newer systems were decided upon early in development . The character designs
  were done by Honjou , who had worked on the previous Valkyria Chronicles games .
  When creating the Nameless Squad , Honjou was
"""
Note how the input and target sequences are shifted by one sub-word. This is to help the model learn to predict each next sub-word given the previous ones.
Setting up DataLoader for Batch training
Next, we use PyTorch DataLoader to create an iterable that loads shuffled batches of BATCH_SIZE samples from train_dataset and val_dataset for training and validation.
# Define batch size
BATCH_SIZE = 32

# Create training and validation DataLoaders
train_loader = DataLoader(train_dataset, batch_size=BATCH_SIZE, shuffle=True, num_workers=0)
val_loader = DataLoader(val_dataset, batch_size=BATCH_SIZE, shuffle=False, num_workers=0)
This creates the following number of batches of training and validation data.
print(f"Number of training batches: {len(train_loader):,}") # Number of training sequences / batch_size
print(f"Number of validation batches: {len(val_loader):,}") # Number of validation sequences / batch_size

"""
Output:
Number of training batches: 27,381
Number of validation batches: 58
"""
Our data is now ready for model training!
Building the MoE Transformer model
We will now set up our MoE transformer model that we built in a previous lesson with a few changes (based on what modern LLMs follow):
We replace the Causal Multi-head Self-attention module with Causal Grouped-Query Attention
We introduce Weight tying, which means we reuse the same weights for both the token embedding matrix and the output projection matrix, rather than learning two separate ones. This is because they do reciprocal functions and have the same shape. This decreases the number of learning parameters in the model by a few million.
We remove the bias term from all linear layers following the Llama models
Let’s implement these one by one.
1. Set up Causal Grouped Query Attention
# Grouped Query Attention (GQA) with Causal Masking
class GroupedQueryAttention(nn.Module):
    def __init__(self, embedding_dim, num_heads, num_groups, max_seq_length):
        super().__init__()

        # Check if embedding_dim is divisible by num_heads
        assert embedding_dim % num_heads == 0, "embedding_dim must be divisible by num_heads"

        # Check if num_heads is divisible by num_groups
        # (Each group must be shared by the same number of heads)
        assert num_heads % num_groups == 0, "num_heads must be divisible by num_groups"

        # Embedding dimension
        self.embedding_dim = embedding_dim

        # Number of total query heads
        self.num_heads = num_heads

        # Dimension of each head
        self.head_dim = embedding_dim // num_heads

        # Number of KV groups
        self.num_groups = num_groups

        # Number of query heads per KV group
        self.group_size = num_heads // num_groups

        # Linear projection matrix for query
        self.W_q = nn.Linear(embedding_dim, embedding_dim, bias=False)

        # Linear projection matrices for key and value
        self.W_k = nn.Linear(embedding_dim, num_groups * self.head_dim, bias=False)
        self.W_v = nn.Linear(embedding_dim, num_groups * self.head_dim, bias=False)

        # Linear projection matrix to produce final output
        self.W_o = nn.Linear(embedding_dim, embedding_dim, bias=False)

        # Build the causal mask once at init instead of every forward pass
        mask = torch.tril(torch.ones(max_seq_length, max_seq_length))

        # Add batch_size and num_heads dimensions
        mask = mask.view(1, 1, max_seq_length, max_seq_length)

        # register_buffer saves it as part of the model so it automatically moves to the right device (CPU/GPU)
        self.register_buffer("causal_mask", mask)

    # Splits Q into multiple heads
    def _split_heads(self, x):
        """
        Transforms input embeddings from
        [batch_size, sequence_length, embedding_dim]
        to
        [batch_size, num_heads, sequence_length, head_dim]
        """
        batch_size, sequence_length, embedding_dim = x.shape

        # Split embedding_dim into (num_heads, head_dim)
        x = x.reshape(batch_size, sequence_length, self.num_heads, self.head_dim)

        # Reorder and return the intended shape
        return x.transpose(1, 2)

    # Splits K or V into num_groups heads
    def _split_groups(self, x):
        """
        Transforms K/V from
        [batch_size, sequence_length, num_groups * head_dim]
        to
        [batch_size, num_groups, sequence_length, head_dim]
        """
        batch_size, sequence_length, _ = x.shape

        x = x.reshape(batch_size, sequence_length, self.num_groups, self.head_dim)
        return x.transpose(1, 2)

    # Merge heads back together
    def _merge_heads(self, x):
        """
        Transforms inputs from
        [batch_size, num_heads, sequence_length, head_dim]
        to
        [batch_size, sequence_length, embedding_dim]
        """
        batch_size, num_heads, sequence_length, head_dim = x.shape

        # Move sequence_length back before num_heads in the shape
        x = x.transpose(1, 2)

        # Merge (num_heads, head_dim) back into embedding_dim
        embedding_dim = num_heads * head_dim
        x = x.reshape(batch_size, sequence_length, embedding_dim)

        return x

    # Forward pass
    def forward(self, x):
        batch_size, sequence_length, embedding_dim = x.shape

        # Compute Q, K, V
        Q = self.W_q(x)  # [batch_size, sequence_length, embedding_dim]
        K = self.W_k(x)  # [batch_size, sequence_length, num_groups * head_dim]
        V = self.W_v(x)  # [batch_size, sequence_length, num_groups * head_dim]

        # Split Q into multiple heads
        Q = self._split_heads(Q)  # [batch_size, num_heads, sequence_length, head_dim]

        # Split K and V into num_groups heads
        K = self._split_groups(K)  # [batch_size, num_groups, sequence_length, head_dim]
        V = self._split_groups(V)  # [batch_size, num_groups, sequence_length, head_dim]

        # Expand K and V so each KV group is shared across multiple query heads
        K = K.repeat_interleave(self.group_size, dim=1)  # [batch_size, num_heads, sequence_length, head_dim]
        V = V.repeat_interleave(self.group_size, dim=1)  # [batch_size, num_heads, sequence_length, head_dim]

        # Calculate scaled dot-product attention
        attn_scores = Q @ K.transpose(-2, -1)
        attn_scores = attn_scores / math.sqrt(self.head_dim)

        # Slice the pre-built mask to the current sequence length
        causal_mask = self.causal_mask[:, :, :sequence_length, :sequence_length]

        # Mask out future positions by setting their scores to -inf
        attn_scores = attn_scores.masked_fill(causal_mask == 0, float('-inf'))

        # Apply softmax to get attention weights
        attn_weights = torch.softmax(attn_scores, dim=-1)

        # Multiply attention weights by V
        weighted_values = attn_weights @ V  # [batch_size, num_heads, sequence_length, head_dim]

        # Merge head outputs
        merged_heads_output = self._merge_heads(weighted_values)

        # Obtain final output
        output = self.W_o(merged_heads_output)

        return output
2. Set up Expert and Router
An Expert is simply a small feed-forward network that specializes in a particular skill, which may involve processing different token types (numerical/code/language-related tokens), reasoning patterns, context patterns, and so on.
